4th Of July Oreo Balls
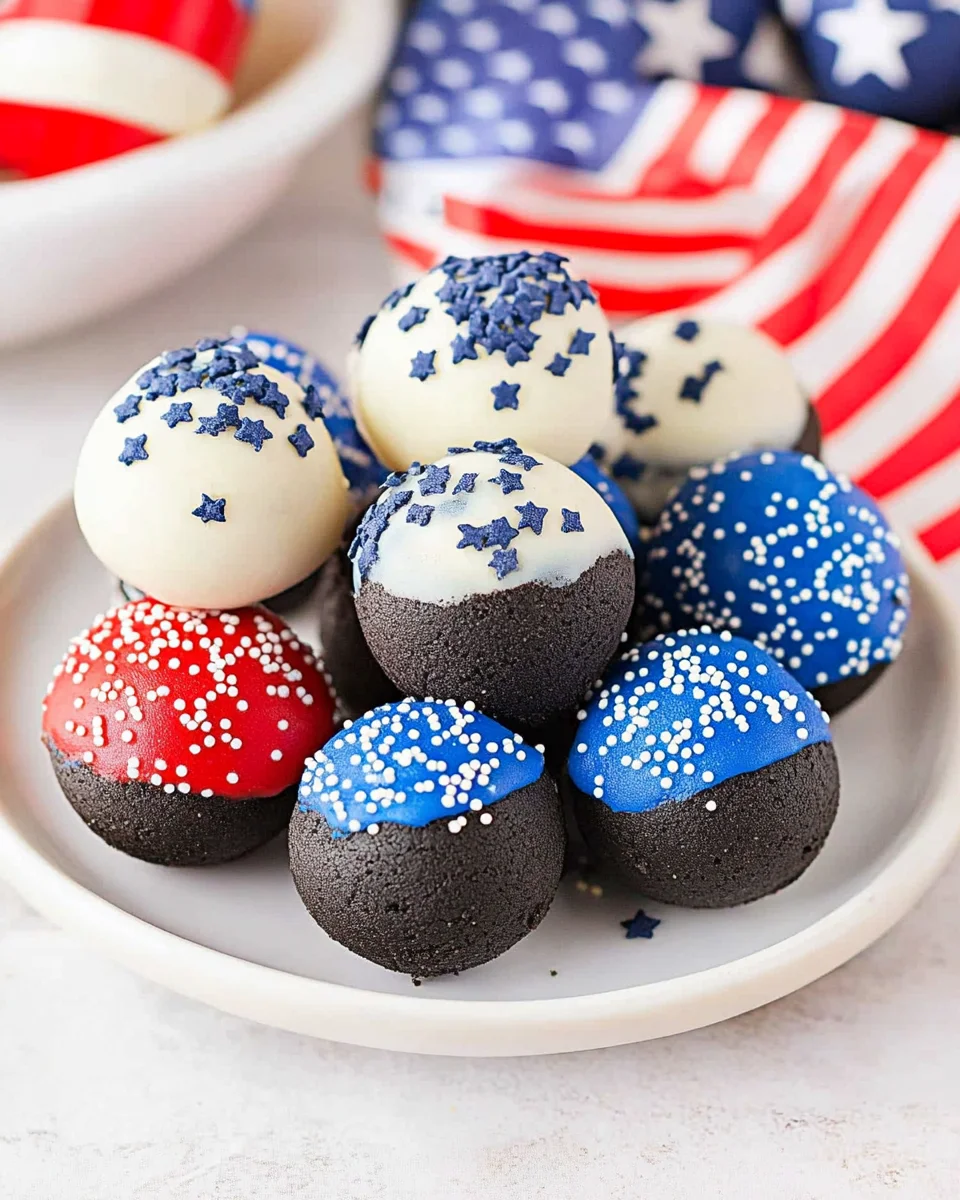
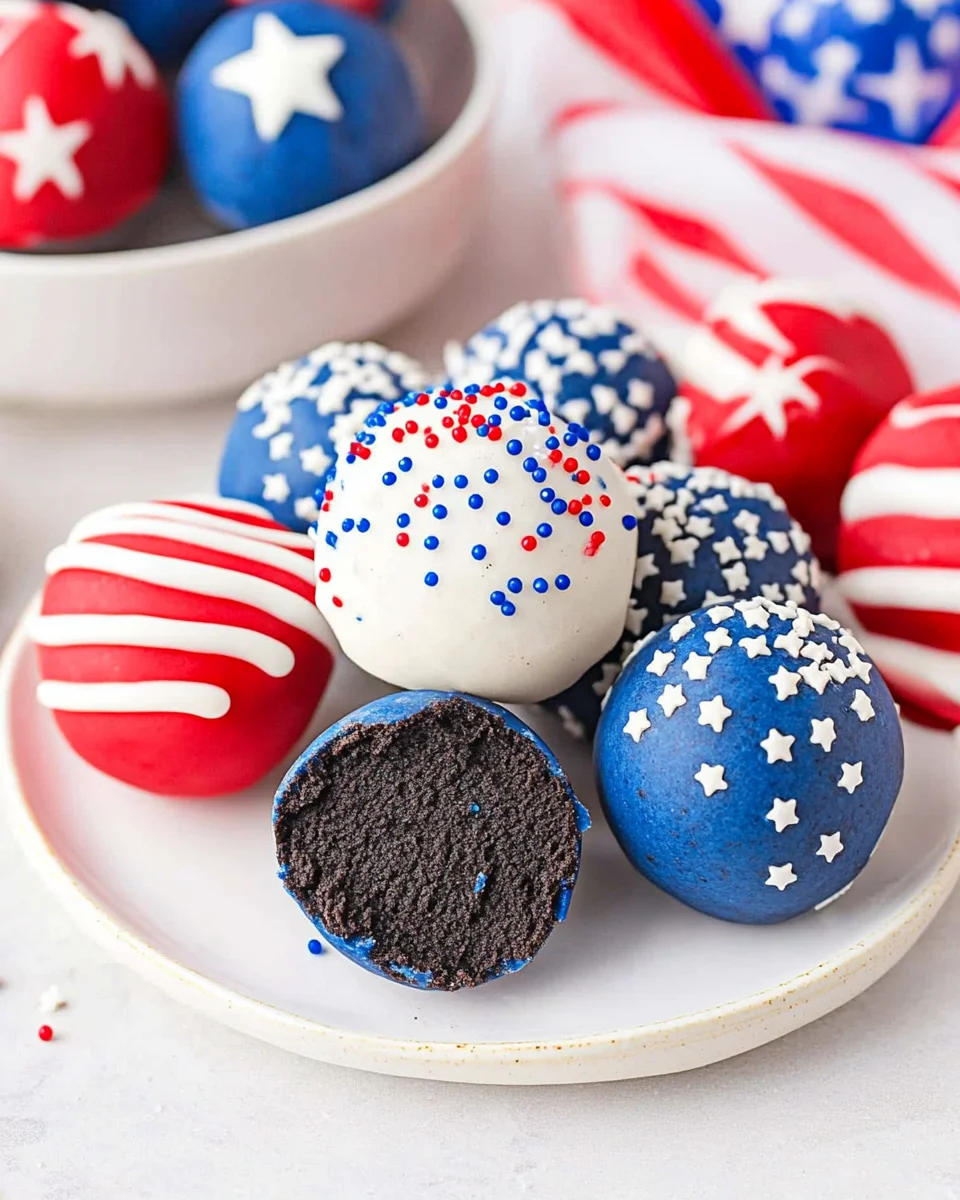
These 4th of July Oreo balls are the perfect festive dessert to celebrate Independence Day! Bursting with patriotic colors and flavors, these no-bake treats combine the rich taste of Oreo cookies with creamy cheesecake. Ideal for summer gatherings, potlucks, or backyard barbecues, they are sure to impress guests of all ages. With their easy preparation and delightful presentation, you’ll want to make these every year!
Why You’ll Love This Recipe
- Simple to Make: No baking required! Just mix, roll, and chill for a hassle-free dessert.
- Patriotic Presentation: The vibrant red, white, and blue colors make these treats a showstopper at any celebration.
- Kid-Friendly Fun: Perfect for kids to help with—rolling and decorating is a fun activity for everyone!
- Versatile Flavor: Enjoy the delicious combination of chocolate and cream cheese that appeals to both adults and children.
- Perfect for Any Occasion: While ideal for 4th of July celebrations, these Oreo balls can be enjoyed year-round for birthdays or holidays.
Tools and Preparation
Before diving into making your 4th of July Oreo balls, gather your tools. Having everything on hand will streamline the process and ensure you create these treats efficiently.
Grab This Chef Knife Now - Almost Gone!
- Stays Razor-Sharp: Ice-hardened blade keeps its edge longer than ordinary knives
- Superior Grip Control: Unique finger hole design gives you perfect balance and safety
- Built to Last a Lifetime: Premium stainless steel blade with elegant beech wood handle
Customer Reviews ★★★★★
Essential Tools and Equipment
- Food processor
- Mixing bowl
- Baking sheet
- Parchment paper
- Microwave-safe bowl
- Fork or dipping tool
Importance of Each Tool
- Food processor: Makes crushing the Oreo cookies quick and easy for a smooth mixture.
- Microwave-safe bowl: Essential for melting candy melts evenly without burning.
- Parchment paper: Prevents sticking when cooling your Oreo balls on the baking sheet.
Ingredients
For the Base
- 1 lb Oreo Cookies (2.12 oz Family Size package)
- 8 ounces Cream cheese (softened to room temperature)
For the Coating
- 12 ounces Blue candy melts
- 12 ounces Red candy melts
- ⅓ cup White melting wafers
For Decoration
- White star confetti sprinkles for topping
How to Make 4th Of July Oreo Balls
Step 1: Prepare the Cookie Mixture
- In a food processor, crush the Oreo cookies until they become fine crumbs.
- Add the softened cream cheese to the cookie crumbs.
- Blend until well combined; the mixture should be thick and moldable.
Step 2: Roll into Balls
- Using your hands, take small portions of the mixture and roll them into balls about 1 inch in diameter.
- Place each ball onto a baking sheet lined with parchment paper.
Step 3: Chill the Balls
- Put the baking sheet in the refrigerator for at least 30 minutes to allow the balls to firm up.
Step 4: Melt Candy Coatings
- In separate microwave-safe bowls, melt the blue candy melts, red candy melts, and white melting wafers. Heat in 30-second intervals, stirring between each until smooth.
Step 5: Dip Each Ball
- Using a fork or dipping tool, dip each chilled ball into one color of melted candy coating. Allow excess coating to drip off.
- Place back onto the parchment-lined baking sheet.
Step 6: Decorate Your Treats
- While still wet, sprinkle with white star confetti sprinkles for that festive touch.
- Repeat this process with all colored coatings as desired.
Step 7: Final Chill
- Once all balls are coated and decorated, return them to the refrigerator until set—about another hour.
Now you’re ready to enjoy these delightful 4th of July Oreo balls! Perfect for sharing or savoring solo while watching fireworks!
How to Serve 4th Of July Oreo Balls
Serving 4th of July Oreo balls is as fun as making them! These colorful treats can be displayed in various creative ways to impress your guests and enhance the festive atmosphere.
Festive Platter
- Arrange the Oreo balls on a large platter, alternating colors for a vibrant display.
- Garnish with fresh strawberries or blueberries for added color and flavor.
Individual Treat Cups
- Serve each Oreo ball in a small cup for easy grabbing.
- Use red, white, and blue cups to keep with the patriotic theme.
Dessert Table Feature
- Place the Oreo balls at the center of your dessert table as a focal point.
- Add themed decorations like mini flags or stars around them for extra flair.
Ice Cream Pairing
- Offer vanilla or strawberry ice cream on the side.
- Drizzle chocolate sauce over the ice cream to complement the Oreo balls.
Picnic Style
- Pack Oreo balls in individual bags for a picnic-friendly treat.
- Include a small note wishing everyone a Happy 4th of July!
How to Perfect 4th Of July Oreo Balls
Making perfect 4th of July Oreo balls is all about technique and patience. Follow these tips to ensure your dessert turns out beautifully.
- Chill Your Mixture: Make sure to chill the Oreo mixture before rolling into balls. This helps them hold their shape better.
- Use Quality Ingredients: Opt for high-quality Oreos and candy melts for richer flavors and better results.
- Melt Carefully: When melting candy melts, do it slowly in short intervals to avoid burning. Stir frequently for even melting.
- Decorate Creatively: Get creative with sprinkles and toppings! Use red, white, and blue decorations for that festive touch.
Best Side Dishes for 4th Of July Oreo Balls
To complement your delicious 4th of July Oreo balls, consider these delightful side dishes. They are perfect for your summer celebrations!
- Grilled Corn on the Cob: Brush with butter and sprinkle with salt for a classic summer side.
- Caprese Salad Skewers: Stack cherry tomatoes, mozzarella, and basil on skewers; drizzle with balsamic glaze.
- Classic Coleslaw: A crunchy mix of cabbage and carrots dressed in tangy mayonnaise; it’s refreshing!
- Potato Salad: Creamy potato salad with herbs is always a crowd-pleaser at BBQs.
- Watermelon Feta Salad: Combine sweet watermelon cubes with feta cheese and mint leaves for a refreshing twist.
- Deviled Eggs: A traditional favorite made with hard-boiled eggs, mayo, mustard, and spices; easy to prepare ahead!
Common Mistakes to Avoid
Making 4th of July Oreo balls is simple, but a few common mistakes can hinder your results.
- Skipping the cream cheese: This ingredient binds the Oreo cookie crumbs and adds creaminess. Do not skip or substitute it with other cheeses.
- Not softening the cream cheese: If the cream cheese is cold, it won’t blend smoothly. Always ensure it’s at room temperature for easy mixing.
- Overheating the candy melts: Heating them too much can cause them to seize. Melt in short bursts and stir frequently to maintain consistency.
- Ignoring the chilling time: Allowing the balls to chill properly helps them set. Don’t rush this step, as it affects their texture and taste.
- Using improper storage containers: Store your Oreo balls in airtight containers to prevent them from drying out or absorbing odors.
Storage & Reheating Instructions
Refrigerator Storage
- Store 4th of July Oreo balls in an airtight container.
- They will last up to one week in the refrigerator.
Freezing 4th Of July Oreo Balls
- Place the Oreo balls in a single layer on a baking sheet before freezing.
- Once frozen, transfer them to a freezer-safe bag or container for up to three months.
Reheating 4th Of July Oreo Balls
- Oven: Preheat to 350°F and warm for about 5 minutes. Cover with foil to retain moisture.
- Microwave: Heat in 10-second intervals until slightly warm; be cautious not to overheat.
- Stovetop: Use a pan on low heat; cover with a lid for even warming without drying out.
Frequently Asked Questions
Here are some common questions about making and storing 4th of July Oreo balls.
How can I customize my 4th Of July Oreo Balls?
You can personalize these treats by using different colored candy melts or adding festive sprinkles on top.
Can I make these 4th Of July Oreo Balls ahead of time?
Yes! You can prepare them up to a week in advance and store them in the refrigerator or freeze for longer storage.
What if I don’t have candy melts?
You can use chocolate chips as an alternative, but they may require tempering for a smooth finish.
Are there any variations for these Oreo balls?
Absolutely! You could use different flavored cookies such as mint or peanut butter for unique twists on this classic recipe.
Final Thoughts
These 4th of July Oreo balls are an appealing dessert that combines ease and creativity. They are perfect for summer gatherings, and you can customize them with various toppings or flavors. Give this recipe a try, and enjoy making these festive treats!
4th Of July Oreo Balls
- Total Time: 20 minutes
- Yield: Approximately 24 servings 1x
Description
Indulge in the festive spirit with these delightful 4th of July Oreo Balls! Perfect for celebrating Independence Day, these no-bake treats combine the rich flavors of Oreo cookies and creamy cheesecake, creating a colorful dessert that will wow your guests. With their vibrant red, white, and blue presentation, they are not only delicious but also a visual treat ideal for summer gatherings, potlucks, and backyard barbecues. Easy to prepare and fun to make with family or friends, these Oreo balls will become a staple for your holiday festivities!
Ingredients
- 1 lb Oreo Cookies
- 8 oz Cream cheese (softened)
- 12 oz Blue candy melts
- 12 oz Red candy melts
- ⅓ cup White melting wafers
- White star confetti sprinkles (for decoration)
Instructions
- In a food processor, crush the Oreo cookies into fine crumbs. Mix in softened cream cheese until thick and moldable.
- Roll the mixture into 1-inch balls and place on a parchment-lined baking sheet.
- Chill in the refrigerator for 30 minutes.
- Melt blue and red candy melts in separate bowls in the microwave until smooth.
- Dip each chilled ball into the melted coating, letting excess drip off before placing back on parchment.
- While still wet, sprinkle with star confetti sprinkles. Repeat for all colors.
- Return to the fridge until set—about an hour.
- Prep Time: 20 minutes
- Cook Time: 0 minutes
- Category: Dessert
- Method: No-Bake
- Cuisine: American
Nutrition
- Serving Size: 1 serving
- Calories: 120
- Sugar: 10g
- Sodium: 50mg
- Fat: 6g
- Saturated Fat: 3g
- Unsaturated Fat: 2g
- Trans Fat: 0g
- Carbohydrates: 15g
- Fiber: <1g
- Protein: 1g
- Cholesterol: 10mg

