Rice Krispie Pumpkins
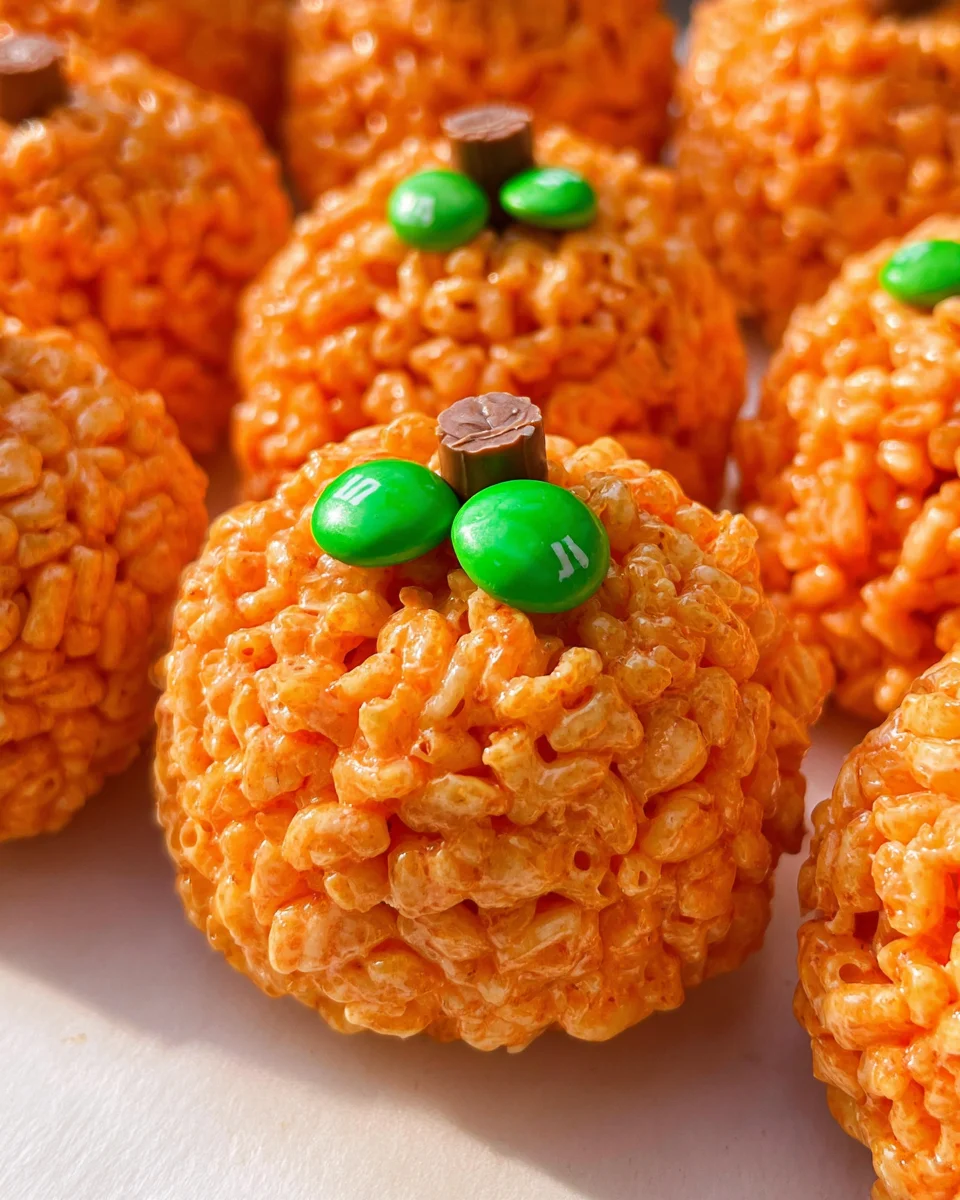
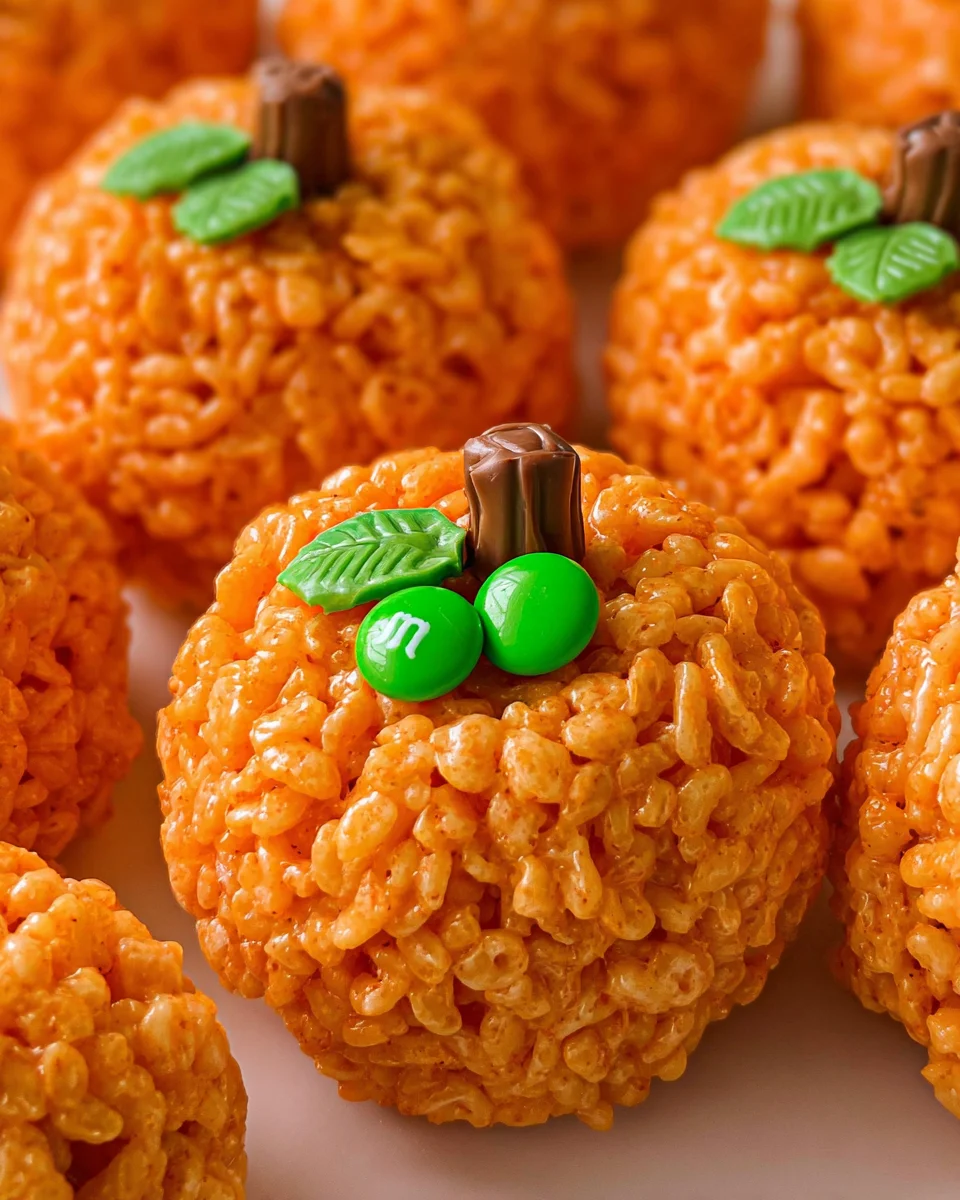
Make fall fun with these easy-to-make Rice Krispie Pumpkins! These no-bake treats are not only adorable but also a delightful way to celebrate the season. Perfect for Halloween parties, school events, or family gatherings, these treats are simple enough for kids to help make and enjoy. Their vibrant orange color and fun shape make them a standout dessert that everyone will love.
Why You’ll Love This Recipe
- Quick and Easy: This recipe requires minimal cooking time and is ready in just 20 minutes.
- Kid-Friendly Fun: Perfect for little hands to help mold the pumpkins, making it an enjoyable family activity.
- Customizable: Adjust the pumpkin color by adding more gel food coloring or use different candies for decoration.
- No-Bake Delight: No oven is needed, making it a safe option for kids and perfect during warm weather.
- Perfect for Occasions: Ideal for Halloween, fall festivals, or as a whimsical treat any time of the year.
Tools and Preparation
Before diving into making your Rice Krispie Pumpkins, gather your tools and prepare your workspace. Having everything ready makes the process smooth and enjoyable.
Grab This Chef Knife Now - Almost Gone!
- Stays Razor-Sharp: Ice-hardened blade keeps its edge longer than ordinary knives
- Superior Grip Control: Unique finger hole design gives you perfect balance and safety
- Built to Last a Lifetime: Premium stainless steel blade with elegant beech wood handle
Customer Reviews ★★★★★
Essential Tools and Equipment
- Large pot
- Wooden spoon or spatula
- Measuring cups
- Non-stick spray
- Baking sheet or plate
Importance of Each Tool
- Large pot: Necessary for melting butter and marshmallows evenly without burning them.
- Wooden spoon or spatula: Ideal for mixing without scratching your pot, ensuring all ingredients blend smoothly.
- Non-stick spray: Helps prevent sticking when forming the rice krispie balls, making cleanup easier.
Ingredients
Here’s what you need to make these delightful Rice Krispie Pumpkins:
For the Treats
- 6 cups Rice Krispies Cereal
- 6 cups Miniature Marshmallows
- 3 tablespoons Unsalted Butter
- Orange Gel Food Coloring
For Decoration
- 10 Tootsie Roll Candies
- 10 Green M&M Candies
How to Make Rice Krispie Pumpkins
Step 1: Melt the Butter
In a large pot, melt Unsalted Butter over medium heat until fully melted.
Step 2: Add Marshmallows
Once the butter is melted, add Miniature Marshmallows. Cook over medium heat, stirring frequently until completely melted.
Step 3: Color the Mixture
Remove the pot from heat. Stir in ½ teaspoon of Orange Gel Food Coloring, adjusting as needed to achieve your desired pumpkin shade.
Step 4: Mix in Rice Krispies
Add Rice Krispies Cereal, stirring until well coated and color is evenly distributed. You can add more coloring if necessary.
Step 5: Form Pumpkin Balls
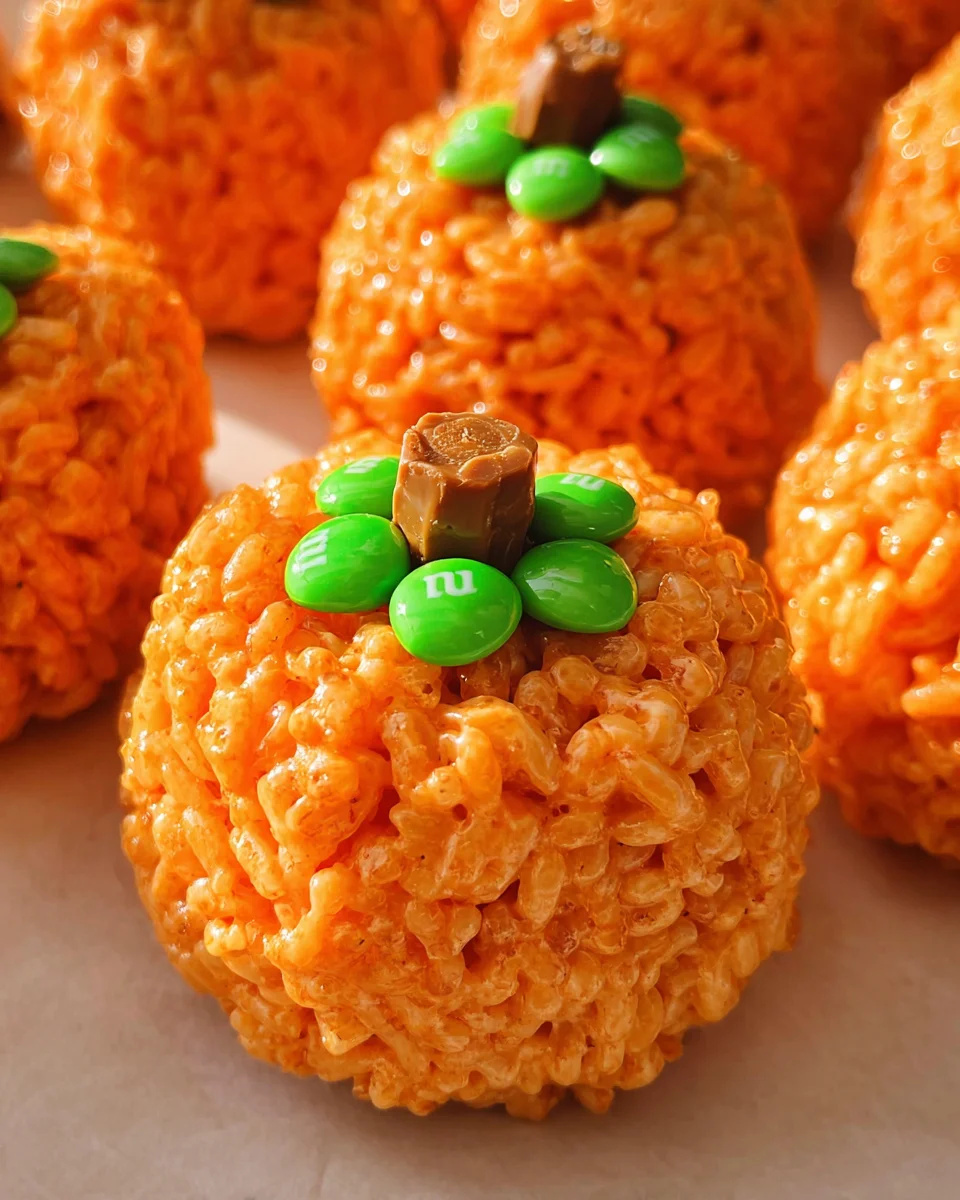
Spray your hands with non-stick spray. Form the rice krispie mixture into 10 large balls.
Step 6: Decorate Your Pumpkins
Insert a Tootsie Roll Candy stump into each pumpkin ball’s center. Place a Green M&M Candy on top to create the leaf.
Step 7: Allow to Set
Let your Rice Krispie Pumpkins set for about an hour before serving. Enjoy this seasonal treat!
How to Serve Rice Krispie Pumpkins
Rice Krispie Pumpkins are delightful treats that can brighten any fall gathering. Here are some fun ways to serve them:
On a Festive Platter
- Arrange the pumpkin treats on a colorful serving platter to create an eye-catching centerpiece for your table.
As Party Favors
- Place each Rice Krispie Pumpkin in a clear bag, tie it with a ribbon, and hand them out as adorable party favors for kids.
At Halloween Parties
- Serve these treats alongside other Halloween-themed snacks like candy corn and ghost-shaped cookies for a spooky dessert table.
With Hot Chocolate
- Pair the Rice Krispie Pumpkins with steaming cups of hot chocolate for a cozy and sweet treat combination.
During Movie Night
- Enjoy these treats while watching family-friendly Halloween movies; they make snacking both fun and festive!
As Classroom Treats
- Send them to school as a special surprise for your child’s class, sharing the joy of the season with friends.
How to Perfect Rice Krispie Pumpkins
Creating the perfect Rice Krispie Pumpkins is easier than you think! Here are some tips to ensure your treats turn out great:
- Use Fresh Ingredients: Make sure your marshmallows and butter are fresh for the best flavor and texture.
- Adjust Color: Add more orange gel food coloring gradually until you achieve your desired pumpkin shade.
- Form Even Balls: Spray your hands with non-stick spray to prevent sticking while shaping uniform balls.
- Don’t Overcook: Stir the marshmallows gently until just melted; overcooking can alter the texture of your treats.
- Let Them Set: Allow the pumpkins to rest for at least an hour before serving so they hold their shape well.
- Experiment with Toppings: Feel free to add additional decorations like sprinkles or edible glitter for extra fun!
Best Side Dishes for Rice Krispie Pumpkins
These sweet treats pair well with various side dishes that complement their flavors. Consider serving these options:
- Apple Slices: Fresh apple slices provide a crisp contrast to the sweetness of the Rice Krispie Pumpkins.
- Cheese Cubes: A platter of assorted cheese cubes balances out the sweetness and adds savory goodness.
- Carrot Sticks: Crunchy carrot sticks offer a healthy option that kids will enjoy alongside their treats.
- Pumpkin Soup: A warm bowl of creamy pumpkin soup is perfect for fall and complements the theme beautifully.
- Popcorn Mix: Create a popcorn mix with nuts, pretzels, and chocolate for a fun, crunchy side dish.
- Mini Sandwiches: Prepare small sandwiches filled with deli meats or cheese for an easy, kid-friendly addition.
- Fruit Skewers: Colorful fruit skewers make a vibrant side that is both healthy and visually appealing.
- Cinnamon Sugar Tortilla Chips: Serve these crispy chips with a side of caramel dip for added sweetness.
Common Mistakes to Avoid
Making Rice Krispie Pumpkins can be a fun and rewarding experience, but there are common mistakes to watch out for.
- Not Melting Marshmallows Properly – Ensure that marshmallows are fully melted before adding Rice Krispies. This will help create a sticky mixture that holds together well.
- Skipping Non-Stick Spray – Forgetting to spray your hands with non-stick spray can lead to a messy process. Always use it when shaping the pumpkins to avoid sticking.
- Using Too Much Food Coloring – Adding excessive orange gel food coloring can alter the texture. Start with a small amount and gradually add more until you achieve the desired shade.
- Not Allowing Enough Time to Set – Rushing the cooling process can result in treats that fall apart. Allow at least one hour for them to set properly.
- Overmixing the Cereal – Stirring too vigorously can crush the Rice Krispies, resulting in a less appealing texture. Mix gently to preserve their shape.
Storage & Reheating Instructions
Refrigerator Storage
- Store in an airtight container at room temperature for up to 3 days.
- For longer freshness, store in the refrigerator for up to 5 days.
Freezing Rice Krispie Pumpkins
- Wrap each pumpkin individually in plastic wrap before placing them in a freezer bag.
- They can be frozen for up to 2 months.
Reheating Rice Krispie Pumpkins
- Oven – Preheat the oven to 200°F (93°C). Place on a baking sheet for about 5-10 minutes until warm.
- Microwave – Heat individual pumpkins on a microwave-safe plate for 10-15 seconds. Be careful not to overheat.
- Stovetop – Use a non-stick skillet over low heat, occasionally turning until warmed through.
Frequently Asked Questions
Here are some common questions about making Rice Krispie Pumpkins.
How do I make Rice Krispie Pumpkins?
To make Rice Krispie Pumpkins, melt butter and marshmallows together, mix in Rice Krispies and orange food coloring, then shape into balls and decorate!
Can I use different colors for Rice Krispie Pumpkins?
Yes! You can customize by using other colors of gel food coloring or even mixing colors for unique designs.
Are Rice Krispie Pumpkins suitable for parties?
Absolutely! These treats are perfect for Halloween parties, school events, or any festive gathering due to their colorful and fun appearance.
How long do Rice Krispie Pumpkins last?
When stored properly, they last about 3 days at room temperature or up to 5 days if refrigerated.
Final Thoughts
These Rice Krispie Pumpkins are not just adorable; they’re also versatile. Feel free to customize them with different candies or colors according to your taste preferences or seasonal themes. Try making these delightful treats today for a fun and easy fall dessert!
Rice Krispie Pumpkins
- Total Time: 20 minutes
- Yield: Makes approximately 10 servings 1x
Description
Make your fall festivities unforgettable with these delightful Rice Krispie Pumpkins! This no-bake treat is not only adorable but also a fun and easy way to celebrate Halloween or any autumn gathering. With vibrant orange colors and a playful pumpkin shape, these treats are perfect for kids to help create and enjoy. In just 20 minutes, you can whip up a batch that will be the star of any party, from school events to cozy family gatherings. Customize them with different candies or colors for added flair, making them a versatile dessert that everyone will love.
Ingredients
- 6 cups Rice Krispies Cereal
- 6 cups Miniature Marshmallows
- 3 tablespoons Unsalted Butter
- Orange Gel Food Coloring
- Tootsie Roll Candies (for decoration)
- Green M&M Candies (for decoration)
Instructions
- Melt the unsalted butter in a large pot over medium heat.
- Add the miniature marshmallows and stir until melted.
- Remove from heat and mix in orange gel food coloring until desired shade is achieved.
- Stir in Rice Krispies cereal until well coated.
- Shape the mixture into 10 large balls using non-stick spray on your hands.
- Insert a Tootsie Roll in the center of each ball for the 'stump' and place a Green M&M on top as the 'leaf.'
- Allow to set for at least one hour before serving.
- Prep Time: 10 minutes
- Cook Time: 10 minutes
- Category: Dessert
- Method: No-Bake
- Cuisine: American
Nutrition
- Serving Size: 1 serving
- Calories: 130
- Sugar: 12g
- Sodium: 45mg
- Fat: 4g
- Saturated Fat: 2g
- Unsaturated Fat: 2g
- Trans Fat: 0g
- Carbohydrates: 24g
- Fiber: 0g
- Protein: 1g
- Cholesterol: 10mg

